Handmade jewelry has become one of the most rewarding creative outlets for people of all ages. Whether you’re drawn to sparkly gemstones, minimalist wire designs, or bold statement pieces, jewelry making allows you to express yourself through wearable art. Beyond its creative appeal, this craft is also practical. You can design one of a kind pieces that fit your personal style, make heartfelt gifts for loved ones, and even start a small business.
The best part? You don’t need a professional workshop or years of training to start. With a few tools, some basic materials, and a little patience, you can make beautiful jewelry right from your kitchen table.
This guide will walk you through everything you need to know about how to make jewelry, including the essential tools, beginner friendly techniques, a step by step project, and tips for taking your skills (and possibly your business) to the next level.
Why Make Jewelry?
Before diving into the “how,” let’s explore the “why.” Jewelry making is not only fun, but it’s also incredibly fulfilling.
Creativity and Self Expression: Every piece you make reflects your unique vision. Unlike store bought jewelry, handmade designs are deeply personal.
Cost Savings: You can create pieces that look boutique quality at a fraction of the price.
Mindfulness and Relaxation: The repetitive motions of beading or wire wrapping can be calming, much like knitting or painting.
Gift Giving: Handmade jewelry carries sentimental value, making it a meaningful gift.
Income Potential: Many hobbyists successfully sell their jewelry on Etsy, Instagram, or at craft fairs.
Tools and Materials You’ll Need
Jewelry making doesn’t require a huge investment, but having the right tools from the start will save you frustration.
Essential Tools
Jewelry Pliers Set – At minimum, you’ll need round-nose pliers (for shaping loops), chain nose pliers (for gripping and opening jump rings), and wire cutters (for trimming excess wire).
Beading Mat – A soft mat prevents beads from rolling away and keeps your workspace tidy.
Crimping Tool – Helps secure clasps neatly and professionally.
Ruler or Measuring Tape – Accurate measurements prevent mismatched earring lengths or bracelets that are too tight.
Hammer and Bench Block – For flattening or adding texture to metal components.
Basic Materials
Beads: Glass, gemstone, acrylic, wood, or metal beads depending on your style.
Wire: Choose from different gauges. Thinner wire (24–28 gauge) is flexible for wrapping, while thicker wire (18–20 gauge) is sturdy for structural designs.
Jewelry Findings: Small components like clasps, jump rings, head pins, and earring hooks.
Cord or Stringing Material: Options include elastic cord (great for bracelets), nylon thread (durable for beaded designs), and leather cord (ideal for boho styles).
Glue (Optional): A strong jewelry adhesive like E6000 can help secure knots or embellishments.
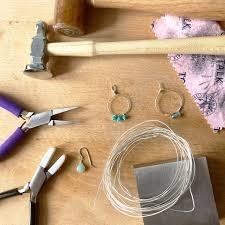
Essential tools for making jewelry at home, including pliers, wire cutters, and beads.
Beginner Tip: Many craft stores sell jewelry-making starter kits, which include tools and a small variety of beads and findings perfect for experimenting before investing in higher quality supplies.
Jewelry Making Techniques for Beginners
There are dozens of jewelry making techniques, but here are four beginner friendly methods to start with.
Beading and Stringing
Perhaps the most accessible technique, beading involves stringing beads onto a wire, elastic, or cord. This is perfect for making bracelets, necklaces, and anklets.
Beginner Advice: Use bead stoppers or a piece of tape at the end of your cord to prevent beads from slipping off.
Creative Twist: Experiment with patterns, alternating bead sizes and colors for unique designs.
Wire Wrapping
Wire wrapping involves using wire to secure beads or stones without glue or soldering. It’s a versatile method for making pendants, earrings, and rings.
Beginner Advice: Start with inexpensive copper or aluminum wire until you master the technique.
Creative Twist: Use wire wrapping to frame crystals or sea glass for a natural, earthy look.
Earrings
Earrings are quick projects that allow endless creativity. By attaching beads or charms to earring hooks, you can make dozens of designs in under 30 minutes.
Beginner Advice: Measure wire lengths carefully to keep pairs symmetrical.
Creative Twist: Try hoop earrings by threading beads directly onto a circular wire base.
Chain Making
Chain jewelry is made by linking metal rings or attaching charms to pre made chains.
Beginner Advice: Always open jump rings sideways (twist, don’t pull) to avoid weakening the metal.
Creative Twist: Add pendants, charms, or layered lengths for stylish, customized looks.
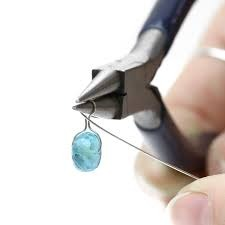
Wire-wrapping technique being used to create a handmade jewelry pendant.
Step by Step Project: DIY Beaded Bracelet
Let’s put these skills into practice with a beginner-friendly project.
Materials Needed
Beading wire or elastic cord
A selection of beads (choose a color scheme for consistency)
Crimp beads (if using beading wire)
Clasp (optional, for wire-based designs)
Scissors or wire cutters
Instructions
Plan Your Design: Lay out your beads in the order you want them. Planning prevents mistakes and gives you a visual preview.
Cut Your Stringing Material: Measure around your wrist and add 2–3 extra inches.
String the Beads: Slide beads onto your cord or wire carefully.
Secure the Ends: Use crimp beads and a clasp for wire, or tie 3–4 secure knots for elastic.
Trim Excess: Snip off extra wire or cord, being careful not to cut too close to the knot or crimp.
Show It Off: Congratulations you’ve just made your first handmade bracelet!
Handmade beaded bracelet created with colorful glass beads.
Tips for Designing Unique Jewelry
As you gain confidence, you’ll want to add more creativity to your designs. Here’s how to make your jewelry stand out.
Experiment with Color: Use a color wheel to find combinations that pop. For example, turquoise and copper make a striking pair.
Mix Materials: Don’t limit yourself by combining beads with leather cord, fabric tassels, or even recycled materials for eco friendly designs.
Sketch First: Keep a design journal where you sketch and jot down notes about bead sizes, patterns, or inspirations.
Stay Inspired: Follow jewelry artists on Pinterest, Instagram, or TikTok to see what’s trending.
How to Turn Jewelry Making Into a Business
If your friends and family love your creations, you might consider selling them. Jewelry is a thriving niche in the handmade marketplace.
Where to Sell
Online: Etsy, eBay, or your own Shopify store.
Social Media: Instagram Reels and TikTok videos showing your process can attract customers.
Local Craft Fairs: Great for meeting customers in person and networking with other makers.
Business Tips
Pricing: Factor in the cost of materials, your time, and a profit margin. Don’t undervalue your work.
Photography: Use natural lighting and a clean background for product photos. Jewelry photography can make or break sales.
Branding: Create a consistent style, from your packaging to your social media presence.
Customer Service: Handwritten thank you notes or small freebies can turn first time buyers into loyal fans.
Love the jewelry made and loved by you
Making jewelry is more than just a craft, it’s a journey of creativity, skill-building, and self expression. With just a handful of tools and some simple materials, you can create bracelets, necklaces, rings, and earrings that reflect your style and bring joy to others.
Whether you want to make jewelry for fun, as thoughtful gifts, or as part of a business venture, the key is to practice, experiment, and enjoy the process. Every piece you create is not just jewelry, it’s a small work of art that tells a story.
So gather your tools, choose your favorite beads, and start crafting today. Who knows? Your next design might just be the piece everyone asks, “Where did you buy that?”