
Best Supplies to Make Your Own Jewelry: Beginner’s Guide to Tools & Material
If you’re looking for a relaxing, profitable, and deeply satisfying creative outlet, look no further than jewelry making. This craft is a perfect fit for everyone from stay at home parents seeking creative skills to designers looking for a new artistic medium, and it offers incredible flexibility; you can craft personalized gifts, create inventory for an Etsy shop, or simply enjoy a rewarding hobby. At its core, jewelry making lets you be creative and artistry. It allows you to translate raw materials into wearable, meaningful works of art.
But where do you start? The world of beads, wire, and findings can feel overwhelming. Many beginners struggle to understand what are good supplies to make your own jewelry without emptying their wallet on unnecessary equipment. This comprehensive guide simplifies the process, walking you through the absolute essentials you need to begin your journey, from the must have tools to the perfect foundational materials. Our goal is to teach people who want to make their own jewelry what supplies they should be using so you can confidently start creating today.
The Essential Toolkit: Your Jewelry Making Foundation
You don’t need a professional jeweler’s bench to start, you need three basic tools and one cutting tool. Investing in quality, beginner friendly tools now will prevent frustration and result in better finished pieces. When learning how to start jewelry making supplies should be categorized, tools always come first.
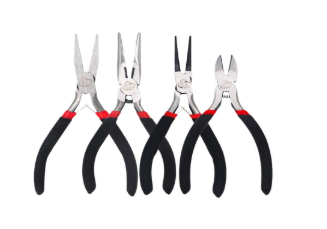
The Core Three Pliers You Need
Pliers are the hands of a jeweler, used for bending wire, gripping small pieces, and securing connections. You need three specialized types:
- Round Nose Pliers: These pliers feature smooth, conical (cone shaped) jaws. They are arguably the most crucial tool for a beginner.
- Function: Used exclusively for creating perfect loops, curves, and coils in wire. They are essential for turning headpins and eye pins into connections for earrings and dangles. The conical shape allows you to create different sized loops by moving the wire up or down the jaw.
- Key Feature: Look for a pair with smooth, untapered tips.
- Chain Nose Pliers (or Needle Nose Pliers): These have flat, long, pointed jaws that taper toward the tip.
- Function: This is your primary gripping tool. They are used for opening and closing jump rings, holding small findings steady, tucking in wire ends, and gently bending straight sections of wire.
- Key Feature: Always choose a pair with smooth, non serrated jaws. Serrated (toothed) pliers will scratch and damage your wire and metal findings.
- Flat Nose Pliers: Similar to chain nose pliers, but with wider, flatter jaws.
- Function: Used primarily for gripping larger surfaces, straightening kinks in wire, and holding components firmly. Many beginners can get by with just two pairs of chain nose pliers (using one in each hand for jump rings), but flat nose pliers offer superior control for parallel bends.
- Pro Tip: Having two pairs of chain or flat nose pliers allows you to grip both sides of a jump ring for safe and secure opening/closing.
The Best Cutters for Your Craft
The last tool you absolutely need is a dedicated wire cutter. Do not use household scissors or kitchen shears, as they will dull quickly and leave jagged edges.
- Flush Cutters (or Side Cutters): These cutters have a specially designed blade that leaves one side of the cut wire perfectly flat or “flush.”
- Function: Provides a clean, professional cut on all soft wires (copper, sterling silver, gold filled) and beading wire (e.g., beading cable). This clean edge is critical when you are finishing off pieces or cutting headpins.
- Important Note: Do NOT use flush cutters on hard materials like memory wire or steel wire, as it will instantly destroy the cutting edge. For hard wire, use heavy duty or designated memory wire cutters.
Must have jewelry supplies
The Building Blocks: Materials and Findings
Now that you have your tools, it’s time to acquire the raw ingredients of your jewelry. Learning how to find correct supplies for jewelry making means understanding the difference between findings (components used to assemble) and materials (components used for decoration).
Essential Findings: The Connectors and Closures
Findings are the small but vital metal pieces that connect, secure, and finish your jewelry. They are the scaffolding of your creative artistry.
- Jump Rings: These are small metal circles with an opening (or seam). They are the fundamental connector in all jewelry. You use them to attach clasps to chains, pendants to bails, and earring wires to dangles.
- Selection: Start with a mix of gauges (thicknesses) and diameters. Common sizes are 5mm and 6mm in 20 or 22 gauge.
- Clasps: You need a way to secure a bracelet or necklace.
- Selection: Lobster clasps (the most popular) and spring ring clasps are excellent choices for beginners. If you are making heavy or ornate pieces, consider a toggle clasp for decorative appeal.
- Headpins and Eye Pins: These are thin pieces of wire used to create beaded dangles and connections.
- Headpins have a flat head or decorative ball on one end to prevent a bead from sliding off.
- Eye pins have a small loop (or “eye”) already formed on one end, allowing you to connect beaded pieces together like a chain. These are essential for creating beaded links.
Choosing Wire, Cord, and Chain
The stringing material you choose depends entirely on the type of jewelry you want to make.
- Beading Wire/Cable: This is a thin, flexible wire made of multiple strands of stainless steel coated in nylon (e.g., Beadalon, Soft Flex). It is used for stringing beads on necklaces and bracelets.
- Tip: Look for wires with 49 strands for the best drape and flexibility.
- Jewelry Wire (Craft Wire): This is solid metal wire (copper, sterling silver, aluminum, brass) used for wire wrapping, making custom findings, and shaping. It is sold by gauge (GA), where a higher number means thinner wire (e.g., 20 GA is thicker and sturdier than 28 GA).
- Beginner Recommendation: Start with 20 or 22 gauge soft copper or brass wire to practice bending and looping without the expense of sterling silver.
- Chain: Pre made chain (cable chain, rolo chain, curb chain) is used for necklaces and bracelets. Buying chain in bulk allows you to cut custom lengths for projects.
Your Artistic Canvas: Beads and Embellishments
This is where your unique creative style shines. Beads and components are the decorative core of your craft. When starting out, prioritize variety over volume and focus on materials that require minimal fuss.
Types of Beads for Beginners
- Glass Beads: Inexpensive, widely available, and come in every color and finish imaginable (e.g., seed beads, fire-polished, druks). They are the workhorse of beading.
- Gemstone and Semi Precious: These beads add a premium, earthy, or luxurious feel. They are usually more expensive and should be reserved for special projects where quality is key.
- Metal Charms and Pendants: Buying pre made charms and pendants (often zinc alloy, brass, or pewter) is a simple way to add focal points to your designs.
Understanding Metal Quality and Budget
As you learn how to start jewelry making supplies will become your biggest investment. Knowing your materials is key to saving money and delivering quality to your customers (if you plan to sell).
| Material | Cost | Durability/Quality | Who It’s For |
| Pewter/Base Metal | Lowest | Can tarnish, suitable for costume jewelry. | Beginners, practice pieces. |
| Sterling Silver | High | Durable, high quality, but requires occasional polishing. | Professional looking, lasting pieces. |
| Gold Filled | High | A thick layer of gold bonded to a base metal; highly durable, tarnish resistant, and a budget friendly alternative to solid gold. | Quality focused makers and sellers. |
Export to Sheets
Don’t feel pressured to buy the most expensive materials right away. Use affordable metals (like copper or plated items) to practice your skills before upgrading to sterling silver or gold filled components.
INTERNAL LINKING OPPORTUNITY: Once you’ve mastered the basic tools, you can move on to specific techniques like wire wrapping. Check out our wire wrapped ring tutorial to apply your new skills!
Next Steps: Organizing, Measuring, and Refining
Essential Measuring and Planning Aids
While not technically tools, these items will dramatically improve the professionalism and consistency of your work:
- Beading Mat/Board: A soft, flocked mat or board prevents small round beads from rolling away while you work. A design board has measurement channels to help you lay out necklaces and bracelets to the correct size.
- Caliper or Ruler: Essential for accurately measuring wire length, jump ring diameter, and bead size to ensure consistency across pairs of earrings or links.
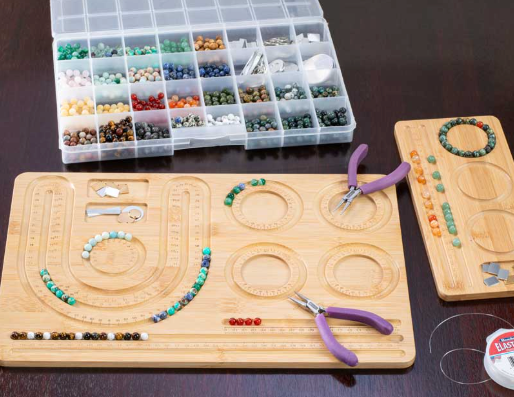
Get great Jewelry making supplies, using a board for beginners makes a huge difference
Smart Storage and Safety
- Storage Containers: Use multi compartment organizers (often sold for fishing tackle or hardware) to sort your beads, jump rings, and clasps by size and color. This prevents frustrating tangles.
- Safety Glasses: If you plan on doing heavier wire work or using a rotary tool (like a Dremel) for sanding or polishing, always wear eye protection.
If you’re still not sure how to find correct supplies for jewelry making or need ideas, start by focusing on a specific technique you want to master, such as simple beading or wire work. This will narrow your required supply list.
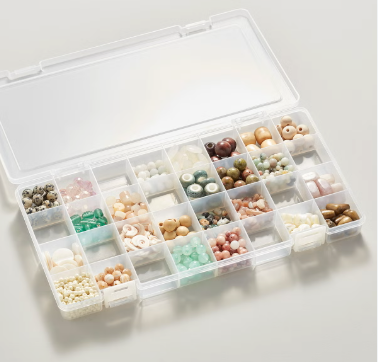
Jewelry making supplies organization is a essential part of jewelry making
Start Creating Your Artistry Today
Your journey into the world of jewelry making starts with these core tools and foundational materials. Remember, jewelry making lets you be creative and be artistry the best creations come from having confidence in your supplies and the freedom to experiment.
Don’t wait for the “perfect” kit. Start with the three essential pliers, a quality flush cutter, and a small selection of wire and findings. This initial investment is all you need to begin creating beautiful, wearable pieces. For more advanced techniques and project ideas, be sure to explore our full section!
Call to Action: Now that you know what are good supplies to make your own jewelry, it’s time to start shopping! Build your basic toolkit today and begin translating your imagination into tangible works of art.